


Description
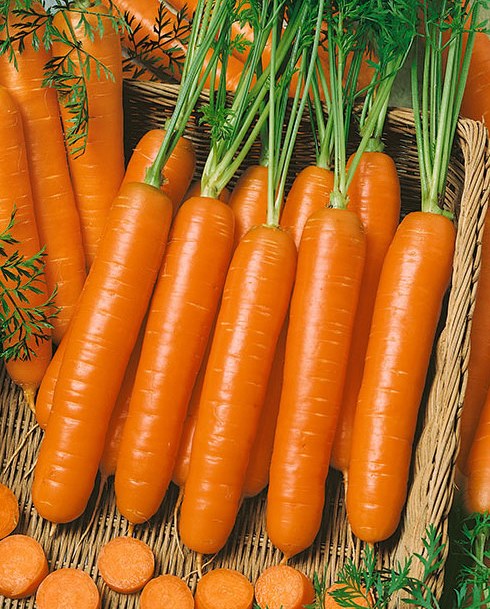
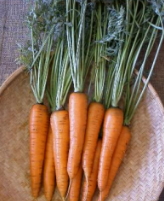
Little Fingers Carrot (a.k.a. Little Finger, Lady Finger, Nantes Little Finger, Sweet Midget – Little Finger)
250 Seeds per pack
Days to Maturity: 50–70 days
Sun Requirements: Full sun; tolerates partial shade.
Botanical Name: Daucus carota
A true miniature heirloom—not a shaved-down imposter. Little Fingers is a 19th-century French heirloom developed to be harvested young—just 3 to 4 inches long. Slender and smooth, these finger-sized, these cylindrical roots develop a deep orange color early, making them ideal for tender baby carrot harvests. Plants remain compact—typically just 6–8 inches tall—making them an excellent choice for container gardens and small spaces.
The flavor is sweet and crisp, with a tender core and fine-grained flesh. Originally bred for canning and pickling whole, this carrot also excels fresh, whether in salads or on veggie trays. Unlike the machine-cut “baby” carrots sold in stores, Little Fingers grows to its naturally petite size without shaping or trimming.
Little Fingers is relatively resistant to pests and diseases, and its uniform roots and early color development make it a favorite among home gardeners and market growers alike. A standout for its appearance, flavor, and size, Little Fingers is a must-have in the garden!
Planting Instructions for Little Fingers Carrot Seeds
When to Plant:
Direct sow Little Fingers carrot seeds outdoors 2 to 3 weeks before your last expected spring frost, once the soil reaches at least 50°F (10°C). Little Finger grows best in cooler temperatures and can be planted again in late summer—about 10 weeks before your first fall frost—for a sweeter, fall-harvested crop. For staggered harvests, continue sowing small batches every 3 to 4 weeks during the main season. Avoid transplanting, as disturbed roots can grow misshapen.
Where to Plant:
Choose a site in full sun with light, loose, stone-free soil. Little Finger thrives in well-drained, fertile soil and benefits from a deeply prepared seedbed. Raised beds or containers work well but aren’t required in most soils. Avoid beds that were recently amended with fresh manure, which can cause forking. A soil pH of 6.0 to 6.8 is ideal. Before planting, loosen the soil at least 12 inches deep and mix in well-aged compost.
How to Sow:
Sow Little Fingers seeds ¼” deep and 1″ apart in rows spaced 12 to 18 inches apart. The seeds are tiny—try mixing them with sand to distribute them more evenly. Cover with ⅛” to ¼” of sifted compost or fine soil, not coarse dirt. Press down gently and keep the surface moist. For best results, cover rows with burlap or shade cloth until the seeds sprout. Germination may take 7 to 21 days depending on soil temperature and moisture.
Watering:
Little Fingers seeds need consistent moisture to germinate properly. Use a fine mist spray or a micro-spray system to avoid displacing seeds. Once established, water about 1 inch per week. When carrots begin to size up, increase watering to 2 inches per week to encourage root development. Avoid inconsistent watering, which can cause roots to split. Always water at the soil level—avoid overhead sprinklers that may promote disease.
Fertilization:
Before sowing, mix in 2–3 inches of compost or well-rotted organic matter. Avoid nitrogen-rich fertilizers, which encourage leafy growth at the expense of root development. Once tops are about 4 inches tall, side-dress with a balanced organic fertilizer or compost tea. Avoid adding extra phosphorus unless your soil is deficient, as it may lead to split or misshapen roots.
Mulching:
Once seedlings are 1–2 inches tall, add a layer of mulch to retain moisture, suppress weeds, and keep soil temperatures consistent. Use straw, shredded leaves, or dried grass clippings. Avoid using fresh clippings, which release too much nitrogen too quickly and can lead to forked roots. Let clippings dry for a few days before applying in a thin layer. Mulch also helps keep carrot shoulders from turning green from sun exposure. In early spring, black plastic mulch can warm the soil and speed up germination.
Thinning:
Thin Little Finger seedlings when they are 1–2 inches tall to about 2–3 inches apart. Use scissors to snip the tops at soil level rather than pulling, which can disturb nearby roots. For baby carrots, thin to 1 inch apart and harvest small roots early. Proper spacing allows Little Finger to grow straight and reach full size.
Pest & Disease Management:
Little Fingers is vulnerable to the same pests as other carrots, including carrot rust fly, weevils, nematodes, and leafhoppers. To prevent damage, use floating row covers from planting until harvest, and avoid disturbing the foliage when weeding, as its scent can attract pests. Rotate crops yearly, and don’t plant carrots in the same area more than once every three years. Keep the bed free of weeds and debris. For nematodes, avoid planting in infected soil and consider interplanting with French marigolds.
Common Diseases:
This variety may be affected by powdery mildew, leaf blights, and root canker. Ensure good air flow by thinning and avoiding overcrowding. Water early in the day and avoid wetting the foliage. Remove any infected plants immediately to prevent spread.
Harvesting:
Little Fingers is typically ready to harvest 50 to 70 days after planting. Begin pulling when roots are 3 to 4 inches long and about ¾ inch wide. These petite carrots are smooth and slender with deep orange skin and a tender, crisp texture. Loosen soil with a fork before pulling to avoid breakage. Trim tops to ½–1 inch after harvest.
Storage:
Store freshly harvested Little Finger carrots in the refrigerator for up to two weeks. For longer storage, leave them in the ground under mulch and harvest as needed, provided your soil doesn’t freeze. Alternatively, store in damp sand or sawdust in a root cellar. Little Finger also preserves well by freezing, canning, or dehydrating.
Freezing:
Wash, peel, and cut Little Finger carrots into slices, coins, or diced pieces. Blanch in boiling water for 2 minutes (or 5 minutes for whole carrots), then transfer immediately to an ice bath. Once cooled, drain thoroughly and spread in a single layer on a parchment-lined baking sheet. Freeze until firm, then pack into freezer bags or containers. Label and store in the freezer for up to 12 months.
Canning:
Use a pressure canner. Wash, peel, and cut Little Fingers into slices or diced pieces. Raw pack or hot pack (simmer 5 minutes). Fill clean jars with carrots and boiling water, leaving 1 inch headspace. Optional: add 1 tsp canning salt per quart. Remove air bubbles, wipe rims, and seal. Process in a pressure canner based on your altitude. Cool completely and check seals after 24 hours.
Dehydrating:
Wash, trim, and peel if desired. Slice or dice carrots, blanch for 2 minutes, and cool in ice water. Drain and arrange in a single layer on dehydrator trays. Dry at 125°F (52°C) for 4–12 hours, until brittle or leathery. Let cool fully before storing in airtight containers in a cool, dark, dry place.
Seed Saving:
Little Fingers is a biennial variety. Leave healthy carrots in the ground or replant them to overwinter. In year two, they’ll flower and produce seed. Isolate by at least ½ mile from other carrot types or use row covers to prevent cross-pollination. Collect and store dried seed in a cool, dry place. Properly saved Little Finger seeds remain viable for 2–4 years. We offer pre-labeled seed-saving envelopes to help you stay organized.
FAQ:
How big do Little Fingers carrots get at harvest?
Little Fingers carrots are typically harvested when they’re 3 to 4 inches long and about ¾ inch in diameter. Their naturally petite, cylindrical shape makes them perfect for baby carrot use without any trimming or shaping.
How long does it take Little Fingers carrots to mature?
These carrots typically mature in 50 to 70 days, depending on weather and soil conditions. For extra sweetness, especially in fall plantings, allow them to grow toward the longer end of that range, as cold weather sweetens them!
Can I grow Little Fingers carrots in containers?
Yes—Little Fingers is especially well-suited to container gardening thanks to its short roots and compact 6–8″ tops. Use light, well-drained soil in a container that’s at least 10 inches deep—though 12 inches is even better to give the roots plenty of room to develop fully. Deeper containers help prevent stunted or forked growth and improve overall yield.
How should I space the seeds when planting?
Sow seeds ¼ inch deep and 1 inch apart in rows spaced 12–18 inches apart. Once seedlings are 1–2 inches tall, thin to 2–3 inches apart to allow for full root development.
What kind of soil do Little Fingers carrots need?
They thrive in light, loose, stone-free soil with a pH of 6.0 to 6.8. Deeply loosen the soil (around 12 inches) and mix in well-aged compost. Avoid fresh manure, which can cause forking.
Are Little Fingers carrots good for preserving?
Absolutely. They were originally bred for whole canning and pickling, and they also freeze and dehydrate well. Their uniform size and texture make them a favorite for long-term storage.
What pests or diseases should I watch out for?
Little Fingers carrots may be bothered by carrot rust flies, nematodes, and leafhoppers. Use floating row covers, rotate crops, and avoid damaging the foliage when weeding. For diseases like blight and mildew, ensure good airflow and water early in the day.
How do I harvest and store Little Fingers?
Harvest when roots are fully colored and 3–4 inches long. Loosen the soil with a fork to prevent breakage. Store in the fridge up to 2 weeks, or longer in damp sand or a root cellar.
Can I save seeds from Little Fingers carrots?
Yes. As a biennial, this variety will flower in its second year. Let healthy plants overwinter, and be sure to isolate from other carrot types to avoid cross-pollination. Once seeds dry, store them in a cool, dry place for 2–4 years.


Patricia Q. (verified owner) –
Awesome seed and seed company
Marsha S. (verified owner) –
Packaging and shipment perfect!
Marylou (verified owner) –
Loved that you sent clear instructions on how to prep, plant and grow. This was unexpected, but what a beautiful surprise.
Bobbie J. (verified owner) –
The seed package was packed securely.
Gail Olsen (verified owner) –
All my favorites from one shop is a time saver. Fast shipping and good value.
Mary (verified owner) –
Seeds sprouted even in not ideal conditions!
Tim Day (verified owner) –
Great deal!
Juli M. (verified owner) –
Sweet and tender!
Richard Wallace (verified owner) –
great
Virginia McManus (verified owner) –
good job
Jeff Mrozinski (verified owner) –
Not sure let ya know around halloween, they just started popping up
Donna Dalton (verified owner) –
good
Anonymous (verified owner) –
Have not planted yet but they arrived quickly!
Sarah C. (verified owner) –
Price was awesome! Nicely packaged items.
Valerie S. (verified owner) –
I have not planted yet but seeds arrived quickly and well packaged. Love St. Clare Seeds!
Marion Franken (verified owner) –
Haven;t planted yet
Regina Harris (verified owner) –
Diane G. (verified owner) –
5 star!
Patricia S. (verified owner) –
St Clare’s. has the most wonderful collection a vegetable and their service is the best . These delightful little gems are tasty and gender
Laura D. (verified owner) –
This carrot is doing well in a self-watering container in my lanai.